Noventum’s very own Brian Stinar is a woodworker. He enjoys creating, and repairing, things made from wood. Normally, this is a hardwood with a finish that brings out the natural wood grain, and some sort of sealant to protect it. Occasionally, it’s a cheap piece of pine which has a coat of paint on it.
He also used to be a programmer, before becoming a manager and salesman. He decided to combine woodworking and programming, by learning how to use the CNC router at a shared workspace called “Quelab.” His family has (had?) lazy Susan food trays, which are nice for putting hot food on a table, when 5+ people are sitting around the table and want some food. Like this:

Figure 1 – Top View

Figure 2 – Side View – Ignore the Chicken Food

Figure 3 – Screw hole access, while rotating, to assemble / disassembly the turntable
One of these split in half, since the wood was glued together without any sort of cross support. So the Stinar family added it to the Christmas fire, after removing the metal Lazy Susan turntable, and Brian decided to program a machine to cut an image of his family into this, instead of a generic nature scene.

Figure 4 – top view of rotating turntable

Figure 5 – side view of rotating turntable
So, he had to learn how to use the machine, by completing the 4+ hour Quelab training. This ended up taking closer to 8 hours, since instead of a generic, boring, example, Brian brought a vector file of both parts he needed (sans picture.) To make sure his measurements were correct, he also modeled this in 3D using OpenSCAD.
So, he had to learn how to use the machine, by completing the 4+ hour Quelab training. This ended up taking closer to 8 hours, since instead of a generic, boring, example, Brian brought a vector file of both parts he needed (sans picture.) To make sure his measurements were correct, he also modeled this in 3D using OpenSCAD.
He cut the bottom piece, and realized centering the turntable in physical reality would be significantly more difficult than centering it in digital reality using design tools. So he modified his design, and added a 1/16th of an inch (sorry metric system) inset. This worked well:
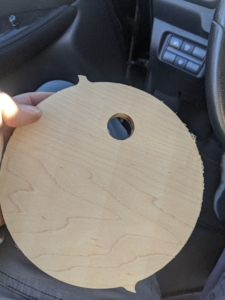
Figure 6 – View of the initial bottom piece with jaggy support material left in place
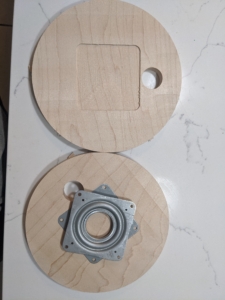
Figure 7 – View of v2.0 of the bottom piece (2x) with insets for the turntable
The top piece will be similar, but significantly bigger. The bottom piece is seven inches (177.8mm) in diameter, while the top will be 17 inches (431.8mm.) The top will also have a thin, 1/4 inch lip, to prevent things from spilling, and to hold two part epoxy. The top part will also require a picture with the background removed.
So, after understanding the industrial process in depth, it’s time to remove the background from the original image.
actually process the image for two t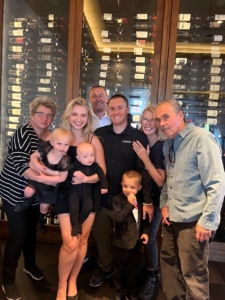
Figure 8 – Initial Image
For a first pass, Brian tried using Gemini (Google’s AI chatbot), Copilot (Microsoft’s) and ChatGPT (the first / most popular.) Out of the three, Gemini avoided wrecking the faces the most. ChatGPT wouldn’t o three days on the free tier plan, since they are losing (at least) $700,000 per day. The other two systems processed my images close to instantly.
Brian used the prompt “Remove the background from this image – replacing it with a solid white.”

Figure 9 – Gemini Background Removal (best / least bizarre artifacts.)
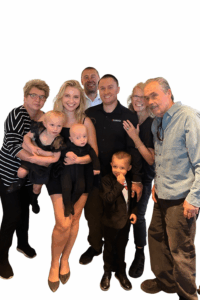
Figure 10 – Copilot generated raw image – lots of artifacts
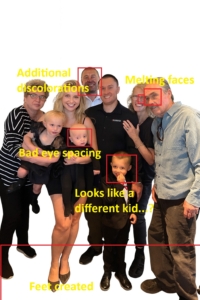
Figure 11 – Copilot generate image with Brian’s annotations
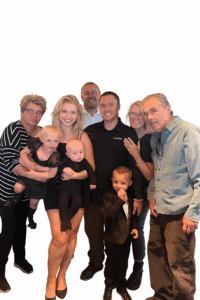
Figure 12 – ChatGPT generated image

Figure 13 – ChatGPT generated image with Brian’s annotations
At this point, Brian proceeded with the Gemini, and cleaned that up by hand (using Gimp / free Photoshop.)
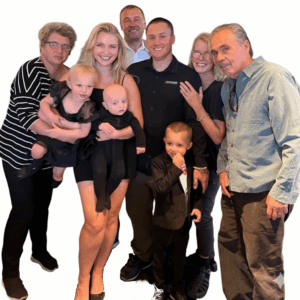
Figure 14 – Gemini with additional background removals by hand, and made into a square
After all of this, Brian started talking with Daria about this project, and she decided to add legs to everyone using AI. These tools speed things up, but with Brian’s not-great photo editing skills, the time spent in messing around with the different AI tools was comparable to the time he would have spent removing the background by hand.
Then, after cleaning up the image, Brian used the VCARVE software to turn this image into a series of toolpaths, to actually drive the router. He used settings from this YouTube tutorial, and a 60 degree bit to do so.
The first attempt was too deep:
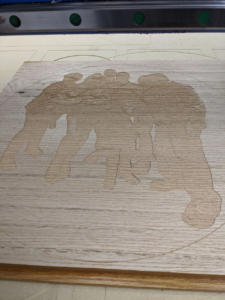
Figure 15 – Error 1
but attempt number two came out good, especially after adding some black spray paint:
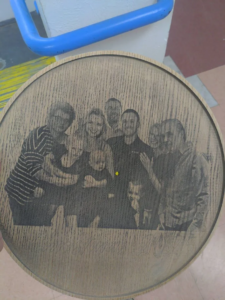
Figure 16 – Good Outcome, No Finish
Here’s after finishing them:
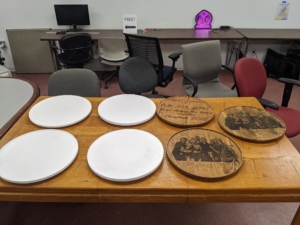
Figure 17 – Everything Finished, whites for kids to paint
The final step was adding two part epoxy to the oak ones with etched photos. That came out well:
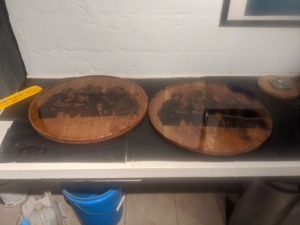
Figure 18 – Finished Products
Overall, this came out well. The 18 hours spend over Christmas Eve and Christmas Day wasn’t the best, but other than that, this was a success.
One of these split in half, since the wood was glued together without any sort of cross support. So the Stinar family added it to the Christmas fire, after removing the metal Lazy Susan turntable, and Brian decided to program a machine to cut an image of his family into this, instead of a generic nature scene.
Figure 4 – top view of rotating turntable
Figure 5 – side view of rotating turntable
So, he had to learn how to use the machine, by completing the 4+ hour Quelab training. This ended up taking closer to 8 hours, since instead of a generic, boring, example, Brian brought a vector file of both parts he needed (sans picture.) To make sure his measurements were correct, he also modeled this in 3D using OpenSCAD.
So, he had to learn how to use the machine, by completing the 4+ hour Quelab training. This ended up taking closer to 8 hours, since instead of a generic, boring, example, Brian brought a vector file of both parts he needed (sans picture.) To make sure his measurements were correct, he also modeled this in 3D using OpenSCAD.
He cut the bottom piece, and realized centering the turntable in physical reality would be significantly more difficult than centering it in digital reality using design tools. So he modified his design, and added a 1/16th of an inch (sorry metric system) inset. This worked well:
Figure 6 – View of the initial bottom piece with jaggy support material left in place
Figure 7 – View of v2.0 of the bottom piece (2x) with insets for the turntable
The top piece will be similar, but significantly bigger. The bottom piece is seven inches (177.8mm) in diameter, while the top will be 17 inches (431.8mm.) The top will also have a thin, 1/4 inch lip, to prevent things from spilling, and to hold two part epoxy. The top part will also require a picture with the background removed.
So, after understanding the industrial process in depth, it’s time to remove the background from the original image.
actually process the image for two t
Figure 8 – Initial Image
For a first pass, Brian tried using Gemini (Google’s AI chatbot), Copilot (Microsoft’s) and ChatGPT (the first / most popular.) Out of the three, Gemini avoided wrecking the faces the most. ChatGPT wouldn’t o three days on the free tier plan, since they are losing (at least) $700,000 per day. The other two systems processed my images close to instantly.
Brian used the prompt “Remove the background from this image – replacing it with a solid white.”
Figure 9 – Gemini Background Removal (best / least bizarre artifacts.)
Figure 10 – Copilot generated raw image – lots of artifacts
Figure 11 – Copilot generate image with Brian’s annotations
Figure 12 – ChatGPT generated image
Figure 13 – ChatGPT generated image with Brian’s annotations
At this point, Brian proceeded with the Gemini, and cleaned that up by hand (using Gimp / free Photoshop.)
Figure 14 – Gemini with additional background removals by hand, and made into a square
After all of this, Brian started talking with Daria about this project, and she decided to add legs to everyone using AI. These tools speed things up, but with Brian’s not-great photo editing skills, the time spent in messing around with the different AI tools was comparable to the time he would have spent removing the background by hand.
This isn’t finished. Brian still needs to cut the top piece, and etch an edited photo into it. This blog post will be updated as that happens.
One of these split in half, since the wood was glued together without any sort of cross support. So the Stinar family added it to the Christmas fire, after removing the metal Lazy Susan turntable, and Brian decided to program a machine to cut an image of his family into this, instead of a generic nature scene.
Figure 4 – top view of rotating turntable
Figure 5 – side view of rotating turntable
So, he had to learn how to use the machine, by completing the 4+ hour Quelab training. This ended up taking closer to 8 hours, since instead of a generic, boring, example, Brian brought a vector file of both parts he needed (sans picture.) To make sure his measurements were correct, he also modeled this in 3D using OpenSCAD.
Video 1 – Adam teaching Brian to use the CNC Router while Brian creates marketing content
Video 2 – CNC Router in Use
He cut the bottom piece, and realized centering the turntable in physical reality would be significantly more difficult than centering it in digital reality using design tools. So he modified his design, and added a 1/16th of an inch (sorry metric system) inset. This worked well:
Figure 6 – View of the initial bottom piece with jaggy support material left in place
Figure 7 – View of v2.0 of the bottom piece (2x) with insets for the turntable
The top piece will be similar, but significantly bigger. The bottom piece is seven inches (177.8mm) in diameter, while the top will be 17 inches (431.8mm.) The top will also have a thin, 1/4 inch lip, to prevent things from spilling, and to hold two part epoxy. The top part will also require a picture with the background removed.
So, after understanding the industrial process in depth, it’s time to remove the background from the original image.
actually process the image for two t
Figure 8 – Initial Image
For a first pass, Brian tried using Gemini (Google’s AI chatbot), Copilot (Microsoft’s) and ChatGPT (the first / most popular.) Out of the three, Gemini avoided wrecking the faces the most. ChatGPT wouldn’t o three days on the free tier plan, since they are losing (at least) $700,000 per day. The other two systems processed my images close to instantly.
Brian used the prompt “Remove the background from this image – replacing it with a solid white.”
Figure 9 – Gemini Background Removal (best / least bizarre artifacts.)
Figure 10 – Copilot generated raw image – lots of artifacts
Figure 11 – Copilot generate image with Brian’s annotations
Figure 12 – ChatGPT generated image
Figure 13 – ChatGPT generated image with Brian’s annotations
At this point, Brian proceeded with the Gemini, and cleaned that up by hand (using Gimp / free Photoshop.)
Figure 14 – Gemini with additional background removals by hand, and made into a square
After all of this, Brian started talking with Daria about this project, and she decided to add legs to everyone using AI. These tools speed things up, but with Brian’s not-great photo editing skills, the time spent in messing around with the different AI tools was comparable to the time he would have spent removing the background by hand.
This isn’t finished. Brian still needs to cut the top piece, and etch an edited photo into it. This blog post will be updated as that happens.